Più recenti del 1° gennaio 2023:
find dir_path/ -type f -newermt "2023-01-01 00:00:01" | xargs rm -rf
Più vecchi del 1° gennaio 2023:
find dir_path/ -type f ! -newermt "2023-01-01 00:00:01" | xargs rm -rf
4 Luglio 2025
di admin@admin
Commenti disabilitati su Linux, cancellazione files più recenti o più vecchi di una certa data
Più recenti del 1° gennaio 2023:
find dir_path/ -type f -newermt "2023-01-01 00:00:01" | xargs rm -rf
Più vecchi del 1° gennaio 2023:
find dir_path/ -type f ! -newermt "2023-01-01 00:00:01" | xargs rm -rf
22 Aprile 2024
di admin@admin
Commenti disabilitati su Aumentare il numero di watchers in Linux
You can get your current inotify file watch limit by executing:
$ cat /proc/sys/fs/inotify/max_user_watches
When this limit is not enough to monitor all files inside a directory, the limit must be increased for Listen to work properly.
You can set a new limit temporary with:
$ sudo sysctl fs.inotify.max_user_watches=524288
$ sudo sysctl -p
If you like to make your limit permanent, use:
$ echo fs.inotify.max_user_watches=524288 | sudo tee -a /etc/sysctl.conf
$ sudo sysctl -p
You may also need to pay attention to the values of max_queued_events and max_user_instances if listen keeps on complaining.
6 Settembre 2023
di admin@admin
Commenti disabilitati su PHP-FPM settings tutorial. max_servers, min_servers, etc.
Fonte: https://thisinterestsme.com/php-fpm-settings/
You need to know three things about your server before you change PHP FPM’s settings.
To find out how many cores your server has, run the following command:
echo Cores = $(( $(lscpu | awk '/^Socket/{ print $2 }') * $(lscpu | awk '/^Core/{ print $4 }') ))
When you run the Linux command above, you will get something like “Cores = 4”.
Write that figure down because it’s important.
You should already know how much memory your server has.
The real question here is: How much memory do you want to give PHP?
You have to take into account the fact that your server might also be running NGINX, Apache, or MySQL. How much memory are these other processes consuming? If you have 8GB of RAM and the other processes on your machine are consuming 2GB, that leaves you with 6GB.
Or 5GB if you want to play it safe and leave some free.
Determine how much memory you want to give PHP and jot that down. In my case, I had 4GB that I could allocate to PHP.
This will depend on your application and your version of PHP. Older versions of PHP tend to consume more memory than PHP 7.
Run the command below to get a general idea of how much memory each PHP FPM process is consuming.
ps --no-headers -o "rss,cmd" -C php-fpm7.2 | awk '{ sum+=$1 } END { printf ("%d%s\n", sum/NR/1024,"M") }'
Note that the command above is looking for a process called php-fpm7.2. The PHP process on your server might be called something different.
To find out the name of your PHP process, use the top command. When you run the top command, you will probably see one of the following processes:
When I ran the command above, I got 29M.
In other words, each php-fpm7.2 process on my server consumes about 29MB of RAM.
I now have three important pieces of information.
Now it is time to edit the www.conf file, which is located in the pool.d directory. On my server, it was located at:
/etc/php/7.2/fpm/pool.d/www.conf
On your machine, the location might be slightly different.
There are 4 configuration values that we are going to change in the www.conf file:
To get a good value for this, you should take the memory that you want to allocate to PHP FPM and divide it by the average memory that is consumed by each PHP FPM process.
In my case, I want to allocate 4GB (4000MB) and each process consumes about 29MB.
Divide 4000 by 29 and you get around 138.
So I set pm.max_children to 138.
If you have 8000MB to spare and your PHP consumes about 80MB per process, then that will be: 8000 / 80 = 100.
For pm.start_servers, I multiply the number of cores that I have by 4.
4 x 4 = 16
So I set pm.start_servers to 16.
If you have 8 cores, then it will be: 4 x 8 = 32.
For pm.min_spare_servers, multiply the number of cores that you have by 2.
In my case, that is 2 x 4 = 8.
So I set pm.min_spare_servers to 8.
For pm.max_spare_servers, multiply the number of cores on your server by 4.
On my machine, that is 4 x 4 = 16.
So I set pm.max_spare_servers to 16, the same value that I used for pm.start_servers.
For these changes to take effect, you will need to restart PHP FPM.
Below, I have included a number of service restart commands that might apply to your setup. Select the correct one and run it.
sudo service php-fpm restart
sudo service php5-fpm restart
sudo service php7.0-fpm restart
sudo service php7.1-fpm restart
sudo service php7.2-fpm restart
sudo service php7.3-fpm restart
sudo service php7.4-fpm restart
25 Maggio 2023
di admin@admin
Commenti disabilitati su Rimozione malware in un processo php
Può capitare che in wp o in altre app i file index.php e .htaccess vengano infettati, puliti con Immunify ma automaticamente reinfettati e posti in 444.Il malware risiede quindi in files del core di wp o del tema, del codice in generale e vanno rimossi.
Successivamente occorre valutare se un processo php rigeneri l’infezione anche se nessun file è ancora infetto:
ps aux | grep php
restituisce tutti i processi php del sistema, oppure più nello specifico:
ps aux | grep parte_del_nomedominio
i processi php che riguardano il dominio specifico.
Questo può restituire qualcosa del tipo:
userftp+ 19980 0.0 0.0 577440 29928 ? S 12:17 0:00 /opt/plesk/php/7.4/bin/php /var/www/vhosts/nomedimio/wp-admin/iyow.php
Questo file non esiste (presumibilmente perchè pulito in precedenza dall’antimalware) ma il processo continua ad persistere e ad infettare (per esempio, risovrascrivendo i file .htaccess e inde.php e ponendoli in 444).
Basta quindi killare il processo con pid 19980.
kill 19980
P.S.: per sicurezza in questi casi, oltre che aggiornare plugin e file del core, è utile risovrascrivere tutti i file del core con file puliti (wp-admin,wp-include, ecc… meno il wp-content) con la versione attuale.
In most cases of this type of infection, we find a modified index.php like this:
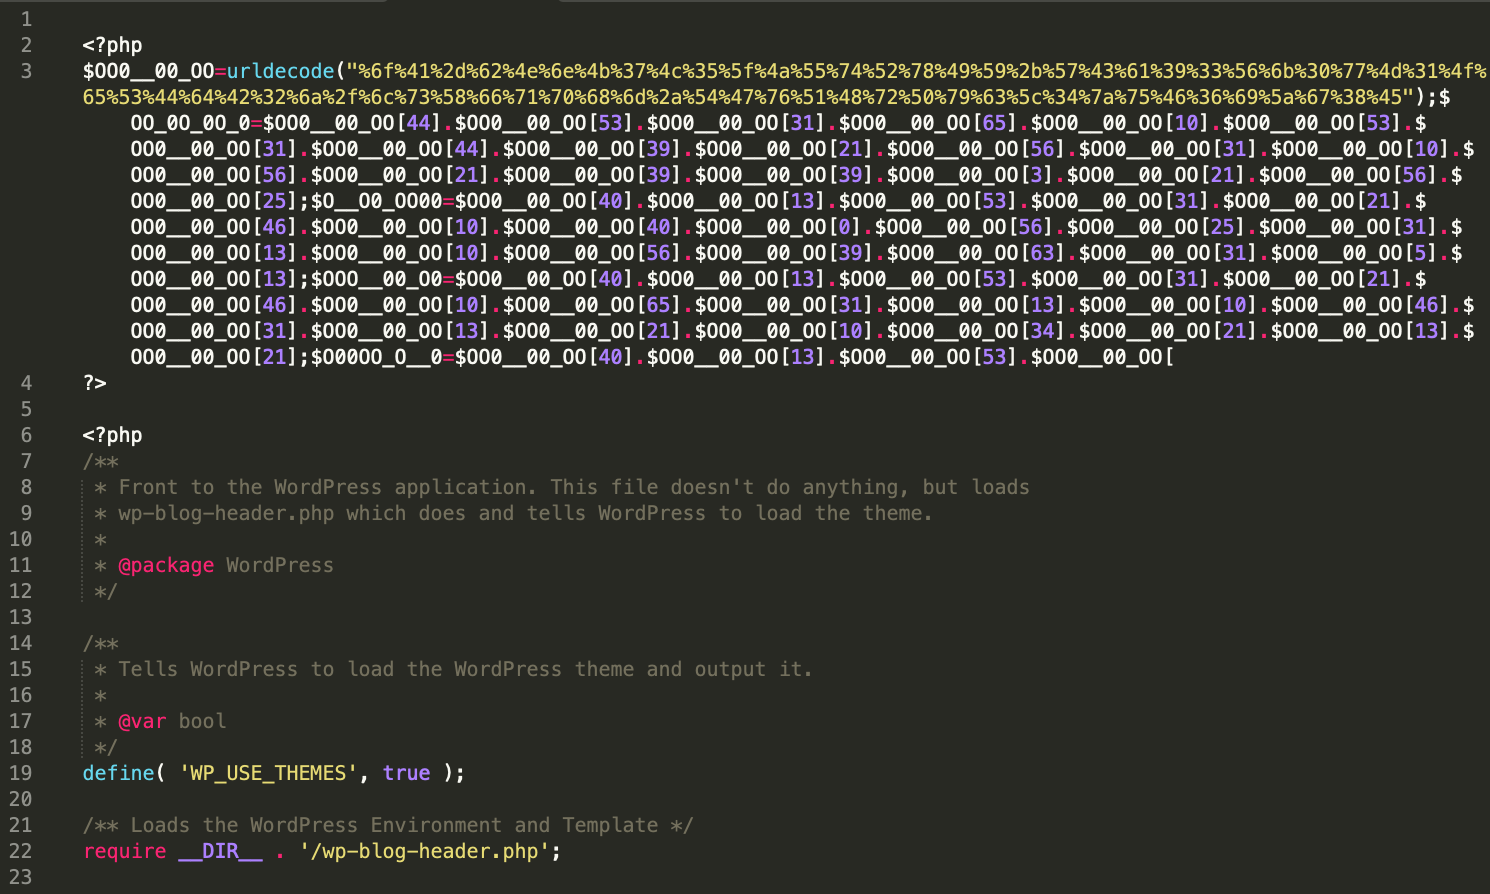
Example of an infected index.php file that automatically re-generates itself through a malicious process running in the background
It doesn’t matter if your site is not running WordPress, the attackers will usually replace the index.php with an infected copy of a WordPress index.php file.
We often also see hundreds or sometimes thousands of infected .htaccess files scattered throughout the website directories. This is designed to prevent custom PHP files or tools from running on the site or to allow the malicious files from running in case there’s some mitigation already in place.

Example of an infected .htaccess file which interferes with the ability to run most PHP scripts
In rare circumstances, the attackers will leave a copy of the original index.php file on the server named old-index.php or 1index.php that we can rename back to index.php. In most cases, the infected files will have been changed to 444 permissions and attempting to remove or clean those files directly is unsuccessful since the malware will immediately create a new infected copy.
As we saw from the infected .htaccess, the attackers have created a list of files allowed to run on the server: about.php, radio.php, lock360.php, etc, which prevent any other PHP files from loading.
These files will usually not exist on the server but instead run as malicious processes. The persistent, running processes on the server are what allows the malware to automatically and immediately reinfect the site once the infection is removed.
Once you’ve found the culprit, you’ll want to stop the malware from running. Create a file from one of those names and add the following content.
For example, if you’ve found radio.php running:
<?php
echo shell_exec("ps aux | grep -i php | awk {'print $2'} | xargs kill -9")
?>
Note: The file name must match one of those listed in .htaccess as those are the only files that are allowed to run on the server. This will ensure our command is successfully run.
The contents of this file will look for all running PHP processes and attempt to stop them.
Next, load your new file in the browser.
hxxps://yourwebsite[.]com/radio.php
You won’t see any content in the browser but if the process was successful, you should be able to rename or delete .htaccess and index.php without seeing a new infected copy being created. If you are not able to access the file you created, you will need to proceed with the SSH steps below.
It is important to note that some malware may not re-create the infected files immediately, and you will want to load your site a couple of times, checking for the reinfected files after each attempt.
Once you have confirmed that the files are not going to return, you will need to remove the remainder of the infection.
If the malware is still present, it is possible that the re-infector exists somewhere in the core WordPress files.
One method we frequently see is a modified wp-includes/plugin.php file designed to re-create the index.php and .htaccess:
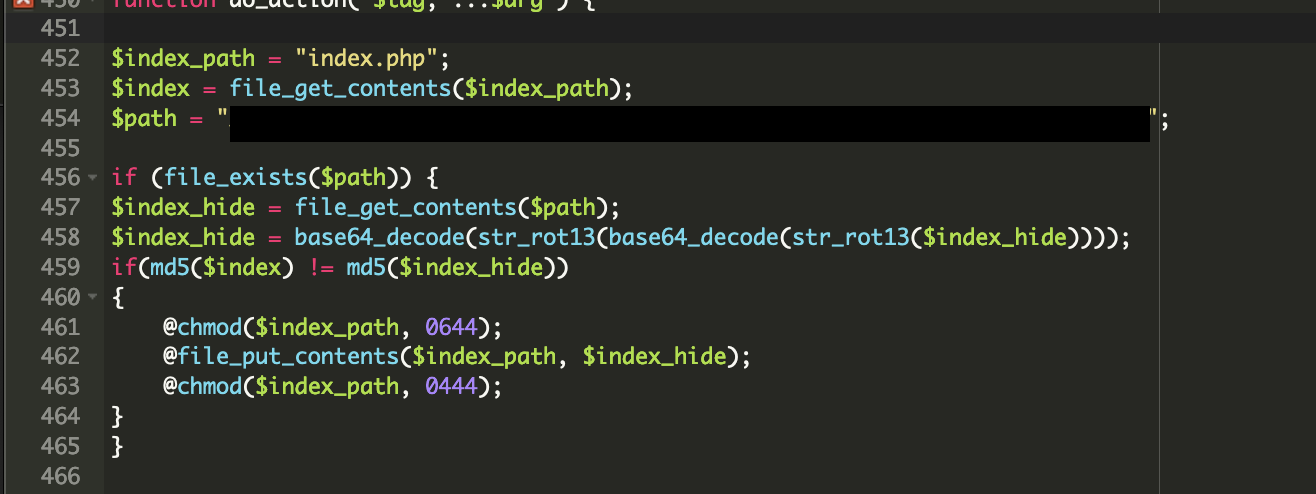
Reinfector malware placed within the WordPress core files
After removing that content, the index.php and .htaccess should be unlocked and you can proceed with cleaning those files along with the remainder of the infection. Though plugin.php is a common point of attack, we have seen similar code on other core files.
One option you have is to replace all of the core site files with fresh copies, and to reinstall your themes and plugins. Some reinfectors are heavily obfuscated and are designed to remain well hidden. It is also not uncommon for the attackers to upload fake plugins to the wp-content/plugins directory that will not be visible from wp-admin.
If previous attempts to clean the infected index.php or .htaccess have been unsuccessful, you may need to gain SSH access or load a CPanel terminal to check running processes.
Run the top command (and press the ‘c’ key to expand the output) or “ps -aux” and look for anything strange there.
Often these cases will reveal something like this:
wp-content/uploads/2021/lock360.php
Or this:
wp-includes/l.php

A malicious process running on the server designed to immediately reinfect the website once files are modified. This can be seen by running “ps -aux” or “top”
In this case, we can see the process running with PID 664739 and we can kill that process.

The “kill” command attempts to terminate the specified process and the -9 flag will attempt to “force quit” it.
If the offending process was responsible for recreating index.php, you should be able to rename the file without seeing a new copy dropping in, and you should be able to proceed with cleaning the remainder of the infection.
In rare cases, the malware will reside in php-fpm memory. If index.php is still being re-created after the above steps have been completed, run top and check for the presence of php-fpm.
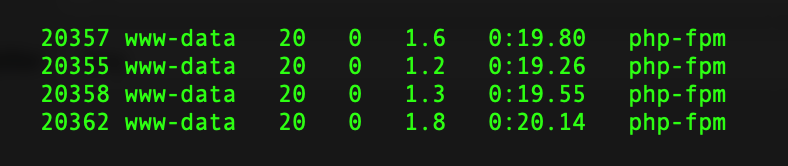
PHP-FPM processes running on a server
Though this usually will not correct the problem, you can attempt to clear OPCache. Create a file in the site’s document root named opcache.php:
<?php
if(function_exists("opcache_get_status") && is_array(opcache_get_status())) {
if (opcache_reset()) { echo "OPCache has been cleared."; }
else { echo "OPCache could not be cleared."; } } else { echo "OPCache is not available"; }
OPcache improves PHP performance by storing pre-compiled script bytecode in shared memory, thereby removing the need for PHP to load and parse scripts on each request. Because of this, malware can persist in OPcache after being cleaned from the site files or database.
You can then test that in the browser and this should attempt to flush the OPcache:
hxxp://yourwebsite[.]com/opcache.php
If OPcache is not enabled, or clearing that did not fix the issue, php-fpm will need to be restarted. You may need sudo access to re-start the service. However, if there are multiple sites on the server then they will all need to be cleaned, otherwise they will likely reinfect each other.
Please note that restarting the service will break all active sessions in all sites – there isn’t any way to target a specific php-fpm pool for these purposes. Restarting php-fpm will also depend on the Linux distribution in use and the specific name/version of the service.
18 Gennaio 2022
di admin@admin
Commenti disabilitati su Plesk courier-imaps: Error: Too many open files
# cat /proc/sys/fs/inotify/max_user_instances
128
# echo “fs.inotify.max_user_instances=200” >> /etc/sysctl.conf
Note: Rough metric is the number of concurrent IMAP sessions multiplied by 4.
# sysctl -p
# systemctl restart courier*
17 Gennaio 2022
di admin@admin
Commenti disabilitati su Plesk: se le email in uscita restano in coda
Per tutti i domini, provare:
plesk repair mail all
oppure per un dominio specifico:
plesk repair mail <nome_dominio>
28 Dicembre 2021
di admin@admin
Commenti disabilitati su Clear swap memory
# swapoff -a
# swapon -a
4 Novembre 2021
di admin@admin
Commenti disabilitati su High CPU usage popuser impad command
Con top, se si verifica qualcosa del genere:
PID | USER | PR | NI | VIRT | RES | SHR | S | %CPU | %MEM | TIME+ | COMMAND
14582 | popuser | 20 | 0 | 48168 | 24m | 1488 | S | 97.3 | 66.2 | 15:22.82 | imapd
molto probabilmente il processo pid 14582 è andato in loop.
Quindi, killare il processo:
kill 14582
e riavviare xinetd:
service xinetd restart
1 Settembre 2021
di admin@admin
Commenti disabilitati su Kill a Process from the Command Line
Fonte: https://www.linux.com/training-tutorials/how-kill-process-command-line/
Learn how to kill errant processes in this tutorial from our archives.
Picture this: You’ve launched an application (be it from your favorite desktop menu or from the command line) and you start using that launched app, only to have it lock up on you, stop performing, or unexpectedly die. You try to run the app again, but it turns out the original never truly shut down completely.
What do you do? You kill the process. But how? Believe it or not, your best bet most often lies within the command line. Thankfully, Linux has every tool necessary to empower you, the user, to kill an errant process. However, before you immediately launch that command to kill the process, you first have to know what the process is. How do you take care of this layered task? It’s actually quite simple…once you know the tools at your disposal.
Let me introduce you to said tools.
The steps I’m going to outline will work on almost every Linux distribution, whether it is a desktop or a server. I will be dealing strictly with the command line, so open up your terminal and prepare to type.
The first step in killing the unresponsive process is locating it. There are two commands I use to locate a process: top and ps. Top is a tool every administrator should get to know. With top, you get a full listing of currently running process. From the command line, issue top to see a list of your running processes (Figure 1).

From this list you will see some rather important information. Say, for example, Chrome has become unresponsive. According to our top display, we can discern there are four instances of chrome running with Process IDs (PID) 3827, 3919, 10764, and 11679. This information will be important to have with one particular method of killing the process.
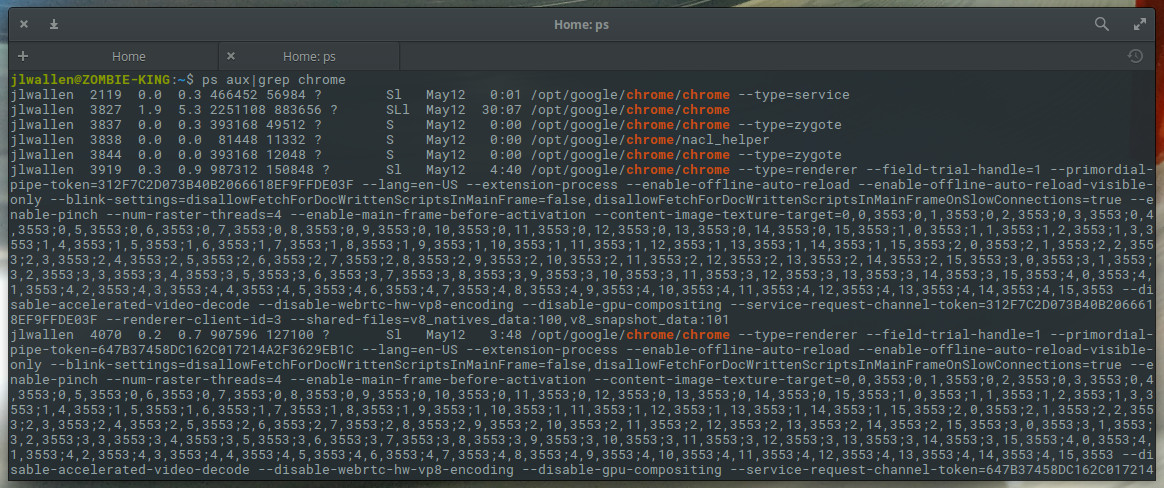
Although top is incredibly handy, it’s not always the most efficient means of getting the information you need. Let’s say you know the Chrome process is what you need to kill, and you don’t want to have to glance through the real-time information offered by top. For that, you can make use of the ps command and filter the output through grep. The ps command reports a snapshot of a current process and grep prints lines matching a pattern. The reason why we filter ps through grep is simple: If you issue the ps command by itself, you will get a snapshot listing of all current processes. We only want the listing associated with Chrome. So this command would look like:
ps aux | grep chrome
The aux options are as follows:
The x option is important when you’re hunting for information regarding a graphical application.
When you issue the command above, you’ll be given more information than you need (Figure 2) for the killing of a process, but it is sometimes more efficient than using top.
Now we come to the task of killing the process. We have two pieces of information that will help us kill the errant process:
Which you use will determine the command used for termination. There are two commands used to kill a process:
There are also different signals that can be sent to both kill commands. What signal you send will be determined by what results you want from the kill command. For instance, you can send the HUP (hang up) signal to the kill command, which will effectively restart the process. This is always a wise choice when you need the process to immediately restart (such as in the case of a daemon). You can get a list of all the signals that can be sent to the kill command by issuing kill -l. You’ll find quite a large number of signals (Figure 3).
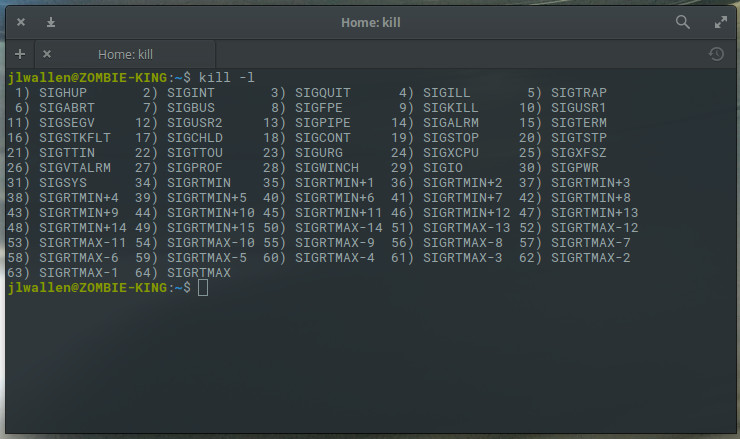
he most common kill signals are:
| Signal Name | Single Value | Effect |
| SIGHUP | 1 | Hangup |
| SIGINT | 2 | Interrupt from keyboard |
| SIGKILL | 9 | Kill signal |
| SIGTERM | 15 | Termination signal |
| SIGSTOP | 17, 19, 23 | Stop the process |
What’s nice about this is that you can use the Signal Value in place of the Signal Name. So you don’t have to memorize all of the names of the various signals.
So, let’s now use the kill command to kill our instance of chrome. The structure for this command would be:
kill SIGNAL PID
Where SIGNAL is the signal to be sent and PID is the Process ID to be killed. We already know, from our ps command that the IDs we want to kill are 3827, 3919, 10764, and 11679. So to send the kill signal, we’d issue the commands:
kill -9 3827

kill -9 3919

kill -9 10764

kill -9 11679
Once we’ve issued the above commands, all of the chrome processes will have been successfully killed.
Let’s take the easy route! If we already know the process we want to kill is named chrome, we can make use of the killall command and send the same signal the process like so:
killall -9 chrome
The only caveat to the above command is that it may not catch all of the running chrome processes. If, after running the above command, you issue the ps aux|grep chrome command and see remaining processes running, your best bet is to go back to the kill command and send signal 9 to terminate the process by PID.
As you can see, killing errant processes isn’t nearly as challenging as you might have thought. When I wind up with a stubborn process, I tend to start off with the killall command as it is the most efficient route to termination. However, when you wind up with a really feisty process, the kill command is the way to go.
25 Gennaio 2021
di admin@admin
Commenti disabilitati su Setup php version to use (only for the current ssh session)
export PATH=/opt/plesk/php/<version>/bin:$PATH;